Building OpenNI 2 Applications with LIPSedge DL 3D Camera
- LIPS
- Dec 2, 2021
- 3 min read
Updated: Mar 14, 2023

Are you looking to build an OpenNI 2 application with a powerful 3D ToF camera? LIPSedge DL 3D camera comes equipped with a software development kit (SDK) that is compatible with OpenNI 2.2 and supports cross-development with both Windows and Linux. In this article, we'll explore how to connect and access LIPSedge DL depth video frames through OpenNI 2, convert the frame to an OpenCV image, and display it in a window.
Prerequisite
Before we get started, make sure you have the following prerequisites installed:
Linux
1. Install the libopenni2-dev
sudo cp [PATH_OF_LIPS_DL_SDK]/Redist/OpenNI2/Drivers/libmodule-lips2.so /usr/lib/OpenNI2/Drivers/ Windows
1. Open Visual Studio and create a new project

2. Create a CMake Project. Enter a project name and select the location you want to save this project. We use ni2DepthViewer as the project name here.

3. The project should contain the following files. We will edit ni2DepthViewer.cpp and CMakeLists.txt later

Overview
The following steps provide an overview of how to build an OpenNI 2 application with LIPSedge DL 3D camera:
1. Include OpenNI and OpenCV headers.
For Linux:
#include <openni2/OpenNI.h>
#include <opencv4/opencv2/core/core.hpp>
#include <opencv4/opencv2/imgproc/imgproc.hpp>
#include <opencv4/opencv2/highgui/highgui.hpp>
For Windows:
#include <OpenNI.h>
#include <opencv2/core/core.hpp>
#include <opencv2/imgproc/imgproc.hpp>
#include <opencv2/highgui/highgui.hpp>
2. Initialize OpenNI 2 library
if (openni::OpenNI::initialize() != openni::STATUS_OK)
{
    printf("Initialize Failed:%s\n",openni::OpenNI::getExtendedError());
    return -1;
}
3. Get connected device list and print device info.
openni::Array<openni::DeviceInfo> deviceList;
openni::OpenNI::enumerateDevices(&deviceList);
for (int i = 0; i < deviceList.getSize(); i++)
{
    openni::DeviceInfo info = deviceList[i];
    printf("[%s@%s / %d:%d] %s\n", info.getName(), info.getVendor(),
           info.getUsbVendorId(), info.getUsbProductId(), info.getUri());
}
4. Connect to the camera
openni::Device device;
if (device.open(deviceList[0].getUri()) != openni::STATUS_OK){
    printf("Cannot open device: %s\n",openni::OpenNI::getExtendedError());
    return -1;
}
5. Create and connect depth stream
openni::VideoStream vsDepth;
if (vsDepth.create(device, openni::SENSOR_DEPTH) != openni::STATUS_OK)
{
	printf("Cannot create depth stream on device: %s",openni::OpenNI::getExtendedError());
	return -1;
}
6. Get stream info including FPS and resolution
openni::VideoMode mode = vsDepth.getVideoMode();
printf("[Depth video] FPS=%d, X=%d, Y=%d\n", mode.getFps(),
       mode.getResolutionX(), mode.getResolutionY());
7. Read a frame from depth stream then create an openCV image with it. DL depth image is in 16 bits format
vsDepth.readFrame(&depth_frame)
cv::Mat imgDepth(depth_frame.getHeight(), depth_frame.getWidth(),
                 CV_16UC1, (void *)depth_frame.getData());
cv::Mat img8bitDepth;
imgDepth.convertTo(img8bitDepth, CV_8U);
8. Close everything when exiting application.
vsDepth.destroy();
device.close();
openni::OpenNI::shutdown();
Build and Run
We use cmake to build our application. Here's the contetn of CMakeLists.txt.
# Specify the minimum required version for cmakecmake_minimum_required(VERSION 3.8)

if(WIN32)
    set(OpenCV_DIR "D:/bin/opencv/prebuilt/opencv/build")
    set(OpenNI2_DIR "C:/Program Files/OpenNI2")
    include_directories("${OpenNI2_DIR}/Include")
    link_directories("${OpenNI2_DIR}/lib")
endif(WIN32)

# Set the name of the project along with the programming language we are using.

project(Ni2DepthViewer CXX)

# Add an executable to the project using the specified source files.
add_executable( ${PROJECT_NAME} ni2DepthViewer.cpp)

# Set c++ standard to c++11
set_property(TARGET ${PROJECT_NAME} PROPERTY CXX_STANDARD 11)

# Link library to executable
find_package(OpenCV REQUIRED)
target_link_libraries( ${PROJECT_NAME} OpenNI2 ${OpenCV_LIBS})

if(WIN32)
# Copy OpenNI2.dll to executable output folder
add_custom_command(TARGET ${PROJECT_NAME} POST_BUILD
    COMMAND ${CMAKE_COMMAND} -E  copy_if_different
    "${OpenNI2_DIR}/Tools/OpenNI2.dll"
    "${CMAKE_BINARY_DIR}/${PROJECT_NAME}/OpenNI2.dll")

# Copy OpenNI drivers to executable output folder
add_custom_command(TARGET ${PROJECT_NAME} POST_BUILD
    COMMAND ${CMAKE_COMMAND} -E copy_directory
    "${OpenNI2_DIR}/Tools/OPENNI2"
    "${CMAKE_BINARY_DIR}/${PROJECT_NAME}/OPENNI2")
endif(WIN32)
Linux
cd [PATH_OF_SOURCE_FOLDER]
mkdir build && cd build && cmake .. && make
./Ni2DepthViewer
Windows
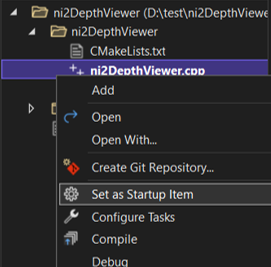
1. Right click on ni2DepthViewer.cpp, select Set as Startup Item.

2. On top menubar, click Debug > Start Debugging.

Full example
For a more detailed example, you can refer to the original article in the LIPS Help Center. If you have any questions or concerns, please feel free to post them on the LIPS Forum.
Conclusion
Building an OpenNI 2 application using LIPSedge DL 3D ToF camera is a straightforward process that can be done on both Windows and Linux platforms. With the help of the SDK and following the steps outlined above, you will be able to access depth video frames and convert them into OpenCV images in no time.


Kommentare